
This image will be an intro to my changing business. I do love all kinds of photography, but to keep it different and more of a specialty, I have decided, for business, to keep it as follows: My goal for the commissioned clients will be to provide them with a dreamy, fantasy type or unique WALL PORTRAIT to begin with. Extra desk prints such as 8x10s or smaller will be an addition to my packages. We all value our time. I want to make both my time and my clients dollars well worth what each of us spend.
With that said, if you are interested in a beautiful 16X20 ready to hang portrait, planned out and custom designed to coordinate with any room, please email me from my web site!
http://www.cherylskinnerphotography.com
Aug 29, 2010
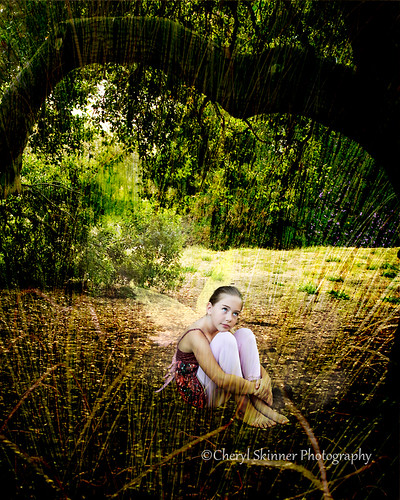
Forest Fairy
Jun 5, 2010
TheShining

In between client sessions I found to play a little bit here. You can't have two girls in the same house and just spend time with one, you know? This is Trinity's version. Thank You, Melanie DeFazio for the inspiration to try this. I hope you don't mind the copy cat. Your work is amazing.
Jun 2, 2010
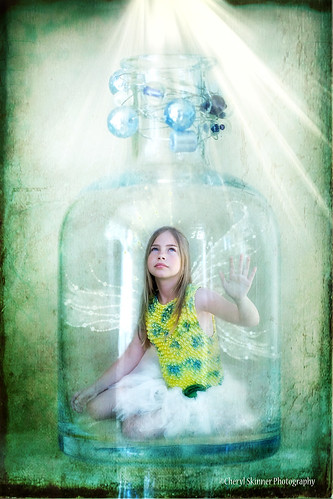
Hope
I finally managed to pull off this shot after months of thinking about it, ever since I saw Melanie DeFazio's photo Stream. My attempt at another one will happen this week, if time allows. You can't have two grand daughters so close to home, and only spend time on one, so there will be more coming soon!
Apr 18, 2010

Kayla in Wonderland
I am doing a test here from Flicker. Seems like my photos are defaulting to the Graphics Garden Blog where I post more creations in digi design.. This isn't suppose to happen. Please bear with me, as I was going to actually catch up on blogger..
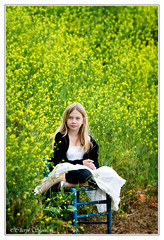
Kayla roams the Mustard plant hills
Kayla roams the Mustard plant hills
The mustard plants must be at their all time high around this area, given all the recent rain we have had. The hardest part of shooting here, is that the hills are full of all kinds of critters as well, and its a bit hard to angle nicely without being higher than your subject. So I stood on an old fence that separates the road from the hills, and proceeded to hold my breath and aim, and balance. Clumsy ole me, of course, fell. After that hard fall and tweaking my body ( it seemed like it was all in slow motion!) enough to skin up my back and pull muscles, but save my lens which was headed right for the dirt, I didn't have to ask myself if it was worth it. It's always worth it when Kayla is my subject!! Look for more soon as I go through these.

Mar 6, 2010
OFF TO VEGAS
Some of you may be wondering where I have been. Its been a long road the last three months. My Mother board died right after the new year unfolded.. Im extremely grateful for the work the lord had given me in DEC. and for the computer holding out just long enough for me to skid into 2010!
It wont be long now until the new one arrives and I can jump right on into my Digital work again. I wanted to thank some special people in my life on this neglected blog before heading out to Vegas for WPPI tomorrow!!
First of all, Thank You so much, JE Neuhaus, for saving my life and retrieving my files from the ole hard drive!! That will be gas in my car, food in my mouth, etc. in the long run, when I can finally put some collages and hard bound books together for clients who have been so patient with me the last 3 months! Not only did my good friend and fellow photographer save my behind, but loaned me a computer to get by on!
I would like to also thank Amy Parrish for her purchase of my digital designs a while back. Amy was granted 3 Grand in Azuka Book products!! Please visit her blog to see her work : http://www.Amyparrish.com.
I am so excited to see some of my work in the Azuka sample book she made at the trade show at Azuka's booth. I just really want to express how honored I truly am to have her include my name in her upcoming presentation at the MGM Grand in VEGAS, BABY!! Woo hoo! I am excited and hope to run into some of my friends who are lucky enough to be there this year!( I am dragging my husband out to Vegas again just by the hair of my chinney chin chin..
When I get back, hopefully my new computer will have arrived, I can continue to add to my latest paper pack, and start shooting regularly with a faster, more efficient work flow. And yes, update my blog more frequently as well!!
See you soon!
Jan 21, 2010
The Graphics Garden: New Digi Paper Pack: The Grab Bag
The Graphics Garden: New Digi Paper Pack: The Grab Bag
http://www.cherylskinnerphotography.com
New Digi Paper Pack: The Grab Bag

Check out the newest 25 papers for your Valentines day cards or every day use! Papers are 12x12 jpg. files. for a closer view, check out the papers from my web site by finding me at http://www.cherylskinnerphotography.com
Find the featured Digi paper gallery from my portfolio tab. This pack is 20.00 for 25 papers!! I love the vintage ones, but there may be something for everyone here! That's a lot of paper and texture! Please email ldylites@aol.com to purchase this pack and we will go from there!
Sep 23, 2009
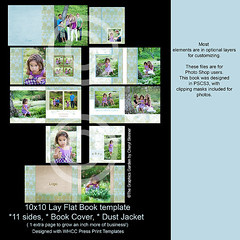
10x10 LayFlat WHCC Book
Linking from my Flicker Page. I will be adding more templates soon from my Pearl Paper Pack!
This collection of pages makes a beautiful lay flat coffee table book. I used photos from the cutest family and my favorite location to shoot, to showcase this sample. They, actually, were the inspiration for making this template.
The package includes 11 sides with both cover and dust cover and can easily be downsized to smaller size books, after inserting your photos. Clipping masks are included in the pages, and most elements are opened in layers for customizing.( I designed with blank templates for WHCC lay flat hinged book, 10x10).
This introductory collection is yours for $40.00 and is sent to you in a private link within 12 hours( usually sooner) upon clearance of payment. Please email your request to ldylites@aol.com OR graphicsgarden@aol.com.
Due to the digital nature of this product, no refunds will be given, but I will be glad to help if you need it!
Subscribe to:
Posts (Atom)

